Building acrylic courts is an ideal option for schools, sports clubs, and recreational centers looking for high-quality and durable sports surfaces. Acrylic flooring for sports fields is distinguished by its superior ability to withstand various weather conditions, making it suitable for both outdoor and indoor courts. This type of flooring is a popular choice for tennis courts, basketball courts, and multi-purpose courts due to its slip-resistant properties and ease of maintenance.
What are the steps for building acrylic courts?
Acrylic courts are among the best types of modern courts due to their durability and resistance to weather factors, making them ideal for various sports activities. To ensure the highest quality and performance, it is essential to follow well-thought-out steps during the construction process, starting from ground preparation to applying the final layers and marking. We explain all the steps for building acrylic courts in detail as follows:
1. Preparing the acrylic court site
This stage is the foundation for building acrylic courts, upon which all subsequent execution steps are built. It requires precision and good planning to ensure the success of the project. This includes:
- Inspection and measurement:
- First, the proposed land is carefully inspected using surveying tools to determine dimensions and ensure compliance with standard specifications for building acrylic courts according to the type of court (e.g., tennis or basketball court).
- Wind and sun directions are determined to choose the best angle for building the court.
- Removal of the surface layer:
- Unstable soil or vegetation layer is removed.
- Any obstacles such as trees, rocks, or debris are disposed of.
- Land leveling:
- Precise leveling is carried out using a grader or automatic leveling equipment to ensure surface flatness.
- Drainage slopes (usually 1%) are taken into account to drain rainwater and prevent it from accumulating on the court surface.
- Backfilling and compaction:
- The site is backfilled with layers of sand or gravelly soil.
- Each layer is thoroughly compacted using a roller to ensure cohesion and load bearing capacity.
- Determining the concrete base level:
- The pouring level for the concrete or asphalt base is precisely determined.
- Wood is fixed or strings are stretched to define the final height level of the court.
-
Our Facebook Page
2. Building the concrete or asphalt base for the court
This step is one of the most important stages in building acrylic courts, as it forms the solid base upon which the acrylic layers are built, and it is carried out as follows:
- Choosing the base type
- Reinforced concrete or asphalt can be used as the main base, and the type is chosen based on soil nature, required use, and available budget.
- An asphalt base is preferred in some cases for its ability to withstand thermal expansion and contraction, while a concrete base is characterized by high rigidity.
- Pouring the concrete base
- Wooden forms are prepared around the site to define the pouring area.
- Reinforced concrete is poured with a thickness usually ranging from 10 to 15 cm.
- Steel mesh is used within the pour to increase strength and load bearing.
- Water drainage slopes of approximately 1% towards drainage points or outside the court boundaries are observed.
- The concrete is well leveled using a power float (helicopter) to obtain a smooth surface.
- The surface is left to dry and harden for at least 21 days before starting to apply subsequent layers, with daily watering to ensure proper curing.
- Spreading the asphalt layer (if chosen)
- First, a layer of “base course” (crushed gravel) 10 cm thick is spread and thoroughly compacted.
- Asphalt is spread with a thickness of 5 to 7 cm, using specialized paving equipment.
- The final surface must be smooth and free of undulations.
- The asphalt is left to cool and dry for several days before starting the acrylic work.
3. Preparing and conditioning the court surface
After the concrete or asphalt base is completed and thoroughly dried, the third step in building acrylic courts begins, which is the surface treatment and preparation before applying the acrylic layers. This stage includes the following:
- Surface cleaning
- Dust and dirt are removed using an air blower or mechanical broom.
- Oils or greasy stains, if any, are cleaned using special solvents.
- In some cases, the surface is washed with water and left to dry completely.
- Treating cracks and gaps
- The entire base is inspected to ensure it is free of any cracks or voids.
- Cracks are filled using a special putty or epoxy material compatible with the acrylic system used.
- This treatment is essential to prevent water leakage and damage to the upper layers in the future.
- Surface sanding and leveling
- The surface is sanded using special sanding equipment or manually as needed.
- This process aims to remove any protrusions or excesses and ensure that the surface is smooth and level.
- Sanding residues are removed by a blower or a powerful vacuum cleaner.
- Checking drainage slopes
- The surface slopes are re-tested to ensure that water can flow towards drainage points or outside the court.
- Any incorrect slopes must be corrected at this stage before starting the application of acrylic layers.
- Applying Primer
- A primer layer (acrylic base material) is applied using a roller or sprayer.
- This layer helps improve adhesion between the base and subsequent acrylic layers.
- The primer is left to dry according to the manufacturer’s instructions (often within 2-4 hours).
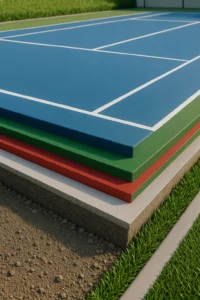
4. Applying the basic acrylic layers
After preparing the surface and applying the primer, the process of applying the basic acrylic layers begins in building acrylic courts, which are carried out precisely according to the coating system approved by the manufacturer, and usually include the following:
- Leveling Paste:
- If there are minor low spots or surface level differences, a special leveling paste is used.
- This material is applied to uneven areas to completely smooth the surface.
- Cushion Layer:
- This layer is responsible for absorbing shocks and reducing stress on joints during play.
- Acrylic material is mixed with fine rubber granules or fine sand according to the required system.
- It is applied using a rubber squeegee or plastic trowel in one or two layers, depending on the desired comfort level.
- Sealer Coat:
- After the cushion dries, a layer of sealer material is applied to close pores and prevent moisture absorption from the lower layers.
- This layer helps improve the cohesion of the final layers and increases their wear resistance.
- Acrylic Base Coat:
- This is the transitional layer between the sub-layers and the final colored layers.
- It is made of acrylic mixed with sand, and usually applied in one layer to provide a cohesive and slightly rough surface that helps the final layers adhere.
5. Applying the final colored layers
After the basic layers have been applied and fully dried, the process of applying the final layers that form the visible playing surface begins, and is carried out according to sports standards and international specifications when building acrylic courts. This includes the following:
- Choosing appropriate colors
- Colors are chosen according to the type of sport and court design, and are often:
- Green/red
- Blue/green
- Blue/grey
- UV-resistant colors are used to maintain color stability for as long as possible.
- Colors are chosen according to the type of sport and court design, and are often:
- Preparing the colored material
- Colored acrylic is mixed with special fine sand in precise proportions according to the manufacturer’s instructions.
- Mixing sand aims to increase slip resistance and achieve a balance between stability and ease of movement.
- Applying the layers
- The colored material is applied using a rubber squeegee or rubber trowel.
- Typically, 2 to 3 layers are applied to ensure even coverage and high durability.
- Each layer must be allowed to dry completely before applying the next layer (drying usually takes 2 to 4 hours, depending on temperature and humidity).
- Ensuring even distribution
- Work is done from one side of the court to the other gradually to avoid differences in color density or layer thickness.
- Any bubbles, streaks, or lumps must be avoided during application.
- Inspecting the final layer
- After application is complete, the surface is visually and tactilely inspected to ensure uniform color and that the surface is free of defects or inconsistencies.
- If any weak areas are found, they can be re-treated with an additional light layer.
6. Drawing lines and boundaries for the acrylic court
After completing the application of the colored layers and ensuring the surface is completely dry when building acrylic courts, the stage of drawing the court lines begins according to the approved standards for each sport, whether it is basketball, tennis, handball, or multi-purpose courts.
- Determining the type of court
- Lines and dimensions vary depending on the type of sport:
- Tennis court: sidelines, service lines, center line.
- Basketball court: center circle, three-point areas, touchlines.
- Multi-purpose court: combines several lines in different colors.
- Using measuring and planning tools
- Accurate tools such as measuring tape, right angles, and taut strings are used to draw lines precisely.
- Dimensions and angles are determined with high accuracy according to international specifications.
- Choosing specialized paints
- Special acrylic paints resistant to weather factors (sunlight, humidity, friction) are used.
- They are often white or yellow, but other colors can be used to distinguish multi-purpose courts.
- Executing the drawing
- Adhesive tape is placed on both sides of the line to precisely define its boundaries.
- The paint is applied using a brush or a small roller.
- The adhesive tape is removed before the paint dries to get a sharp and clear line.
- Ensuring dimensional accuracy
- After completion, the line measurements are checked using measuring tools to ensure they match standard specifications.
- Any measurement error or deviation in dimensions is corrected immediately before project handover.
7. Drying and handover of the acrylic court
After completing the final line marking and ensuring the accuracy of execution in building acrylic courts, the final stage begins: ensuring all layers are dry and formally handing over the project. This includes the following steps:
- Final drying period
- After all work is completed, the court is left for at least 48 hours under suitable climatic conditions.
- The surface must not be exposed to water or heavy loads during this period.
- The drying time varies depending on:
- Temperature
- Humidity level
- Site ventilation
- Technical inspection and review
- A comprehensive inspection of all parts of the court is carried out:
- Cohesion of acrylic layers.
- Quality of lines and colors.
- Drainage slopes and absence of water accumulation.
- Any observations or defects are corrected, if found, before final handover.
- Performance tests
- In some official projects or for certified courts, tests are conducted such as:
- Slip resistance test.
- Ball bounce test.
- Surface durability test.
- These tests prove that the court meets the required performance and safety standards.
- Project handover
- After ensuring that the court is ready and safe for use, the project is officially handed over to the owner.
- Handover includes:
- A brief technical report.
- A maintenance and operation manual, if available.
- Warranties for the materials used (usually 3 to 5 years depending on the executing company).
10 important recommendations when building acrylic courts
- Choose a specialized and experienced contractor:
When building acrylic courts, it is advisable to deal with companies or technicians specialized in the execution of acrylic courts to ensure correct material application according to international specifications. Therefore, Technotrade Sports Company is the best choice when building acrylic courts, known for its professionalism and extensive track record. - Precise base preparation:
The concrete or asphalt base must be durable, level, have correct slopes for water drainage, and be free of any cracks or joints. - Use high-quality materials:
Reliance must be placed on certified acrylic paints and materials resistant to UV radiation and weather factors to ensure color stability and wear resistance. - Execute work in suitable climatic conditions:
It is preferable to apply layers in dry weather, at moderate temperatures (between 15 – 30 degrees Celsius), avoiding rain or high humidity during application. - Precisely adjust water drainage slopes:
The floor slope should not be less than 1% for effective water drainage and to avoid water pooling on the surface. - Attention to the surface preparation stage:
The base must be thoroughly cleaned, cracks treated, and the surface sanded before applying the acrylic to ensure adhesion and durability. - Control layer thickness:
The specified number of layers must be precisely applied, with the appropriate thickness for each layer, to avoid cracking or subsidence over time. - Check the quality of line execution:
When building acrylic courts, the lines must be clear, drawn to precise dimensions, and with wear-resistant paints to ensure their visibility during play. - Allow sufficient drying time:
Sufficient time must be allowed after completion before using the court (48 to 72 hours) to ensure complete drying and layer setting. - Establish a periodic maintenance plan:
After building acrylic courts, it is recommended to perform maintenance every 6 to 12 months, including cleaning, inspecting layers, treating any damage, and renewing paint if necessary.
 Are You Looking for the Best Solutions to Equip your Fields with Artificial Turf?
 Call us now |
  Contact us via WhatsApp |